We have completed an exciting 3D project where we designed and created a large 3D model in the form of a helicopter for Netflix's series Helicopter Heist, which was released on November 22, 2024.
This model can be viewed in central Stockholm at the intersection of Kungsgatan/Sveavägen! (Telia's flagship store)
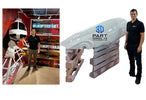
The end result was a really impressive model with a total weight of about 35KG.
The size of the model was approx. 1.4M high x0.65m wide* 1.9m long 

How we work with the customer:
In initial discussions we received a 2D mounted drawing of a shop window where we discussed details of what the helicopter should look like. Once we had discussed our ideas and arrived at an initial specification, the work of creating the large object began in several stages.
Step 1/
We started by drawing up a draft using Blender, then we checked the details with the client and made the updates that were requested. In the final stage, we made several digital montages of how the helicopter would look against a wall.
The final version when we were done with 3D modeling of the helicopter ![]()

Step 2/
When the 3D model was complete and we were satisfied, the next step began - optimizing each part to be created on our 3D printers in the best way!
It became a design challenge as the model was to be a full 1.4 meters high with several parts and sections.
Step 3/ Preparation for manufacturing with FDM 3D technology
After dividing the model for best printability, we started planning how we could retrofit the entire model. Here we used CAD to draw in, support and make the 3D model printable, strong and possible to assemble.
Step 4/ 3D Print in modules for best results
WE began creating the model on our 3D printers, the model weighed just over 35KG and required 5 large 3D printers that ran around the clock for about 3 weeks. 
Step 5/ Assembly
The assembly of the 3D model was not entirely easy due to its size and weight. We started assembling the helicopter from the front to the back. We learned a bitter lesson that the glue built a few extra mm of extra distance per module. We will need to adjust this in the post-processing.
It took about 3 working days for me (Rickard) and Tobias to assemble the helicopter. ![]()
Step 6/ Finishing
In addition to the small displacements, the FDM 3D technology has a disadvantage that it builds each layer separately where the layer lines become visible. The end result would be challenging to achieve as the helicopter should have a completely shiny white color! Every little detail and unevenness needs to be corrected. Here we had to help and do most of the preparatory work.
Mechanical grinding and filling:
It took a lot of putty and many days of basic work (sanding/puttying) to get a good result. ![]()
Step 7/ Painting
We are lucky to work with a skilled painter who in turn took care of the primer and final paint.
Step 8/ Foiling
In the final phase, the customer chose to make the window panes using foiling.
Step 9/ Final assembly with wall bracket
Over time, we designed and created a strong metal bracket that was then used to hang the helicopter on the wall, without visible traces. Both the bracket and the 3D model were designed to be able to handle the high weight.
Summary:
Finally, the finished 3D object was placed in the shop window in central Stockholm at the intersection of Sveavägen/Kungsgatan in Telia's flagship store. The model quickly became a focus for passersby and created a lot of attention for the ongoing advertising campaign. By using 3D-Design and our 3 different 3D printing techniques, we were able to create the perfect customized advertising element that provides a unique and effective visual experience that stood out in an impressive way!
This process combines our creative design ideas with modern technology, resulting in an advertising solution that is not only aesthetically impressive, but also technically advanced and sustainable.